Generators are invaluable devices that provide electricity during power outages or in remote locations. While many generators come equipped with pull-start mechanisms, converting them to electric start can make them more convenient and user-friendly. In this comprehensive guide, we will walk you through the steps to make your generator electric start. With a bit of DIY know-how, you can ensure a hassle-free power source whenever you need it.
How to Convert Pull-Start Generator to Electric Start
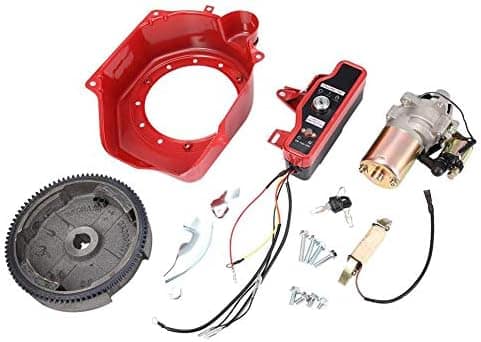
Tools and Materials You’ll Need:
Before we dive into the process, it’s essential to gather the necessary tools and materials:
- Generator (with a pull-start mechanism)
- Electric starter motor kit
- Battery (12V)
- Solenoid switch
- Wiring and connectors
- Wrenches and screwdrivers
- Drill and drill bits
- Wire strippers and crimpers
- Safety equipment (gloves, safety glasses)
Step 1: Choose the Right Starter Kit:
Selecting the appropriate electric starter motor kit is crucial for a successful installation. These kits are not one-size-fits-all, as they vary in terms of compatibility with different generator engine types and sizes.
Some generators may have specific requirements, such as starter motor power and mounting locations. It’s essential to consult your generator’s manual and cross-reference it with the kit’s specifications to ensure a perfect fit. Moreover, consider the quality of the components in the kit, as durability is vital for long-term generator reliability. Research and reviews can help you identify reliable brands and models.
Step 2: Disconnect the Spark Plug:
Disconnecting the spark plug wire may seem like a straightforward safety precaution, but it’s a critical step in preventing accidents and ensuring the installation goes smoothly.
The spark plug is responsible for igniting the fuel-air mixture in the engine’s cylinder. If it’s connected during the installation, there’s a risk that the engine could start unexpectedly, posing a danger to anyone working on the generator.
Always double-check that the spark plug is disconnected before proceeding with the installation. Additionally, store the spark plug wire in a safe location where it won’t accidentally reconnect during the process.
Step 3: Locate the Starter Motor Position:
Finding the optimal placement for the starter motor is essential for efficient operation. It’s worth noting that this location can vary among different generator models.
Typically, the starter motor attaches close to the generator’s flywheel or crankshaft, as these are the primary components responsible for starting the engine. When removing covers or other obstructing components, be cautious not to damage any other parts or wiring in the process.
Properly following the manufacturer’s recommendations regarding the starter motor’s position is essential to ensure that the starter engages the engine’s flywheel effectively, allowing for a smooth and reliable start every time.
Step 4: Install the Starter Motor:
Installing the starter motor is a crucial step in the process of getting an engine up and running. The starter motor plays a pivotal role in initiating the combustion cycle of an engine by turning the flywheel or crankshaft. Here are some deeper insights:
Alignment is Key:
Proper alignment of the starter motor with the flywheel or crankshaft is essential for smooth and efficient engine starting. Misalignment can lead to excessive wear and tear on both components and may result in starting issues.
Secure Attachment:
Ensuring the starter motor is firmly fastened in place is not just about preventing it from coming loose. It also helps in dampening vibrations and ensuring that the starter motor’s gear meshes correctly with the flywheel or crankshaft’s teeth.
Starter Motor Types:
Depending on the engine and application, starter motors can vary widely. Some engines may use gear-reduction starter motors, which provide higher torque for heavy-duty applications, while others may use direct-drive starters for smaller engines.
Step 5: Connect the Solenoid Switch:
The solenoid switch is a critical component in the starting system of an engine. It serves as the connection point between the battery and the starter motor, allowing current to flow when you turn the ignition key. Here’s some unique information about this step:
Solenoid Function:
The solenoid switch is an electromechanical device that serves two main functions. First, it acts as a high-current relay, allowing a small electrical current from the ignition key to control a larger current flow from the battery to the starter motor. Second, it engages the starter motor’s pinion gear with the engine’s flywheel before starting.
Starter Safety:
Solenoid switches often incorporate safety features, such as a neutral safety switch. This switch ensures that the engine can only be started when the transmission is in the “neutral” position or the clutch pedal is depressed, preventing accidental starts while the vehicle is in gear.
Wiring Complexity:
The wiring connections for the solenoid switch can be intricate, especially in modern vehicles with advanced electronic systems. These connections may include not only the main battery feed but also control wires that integrate with the vehicle’s computer for precise starting control.
Step 6: Battery Installation:
Proper battery placement and connection in a generator setup are crucial for reliable power generation. When placing the 12V battery, consider these deep and unique insights:
Battery Selection
Choose a high-quality, deep-cycle battery suitable for the generator’s power requirements. Deep-cycle batteries are designed for repeated discharges and recharges, making them ideal for backup power systems.
Location Consideration
The choice of where to place the battery is essential. It should be situated in a well-ventilated area, as batteries can produce gases while charging. Avoid direct exposure to extreme temperatures, as this can affect battery performance.
Secure Mounting
Ensure that the battery is securely mounted in its location. Vibrations from the generator can lead to loose connections or even damage if the battery is not properly secured. Use appropriate mounting brackets or straps to keep it in place.
Terminal Accessibility
Accessibility to the battery terminals is critical for maintenance and safety. Make sure the terminals are easily reachable for connection and disconnection without the risk of accidentally short-circuiting the battery.
Terminal Protection:
To prevent accidental shorts, consider using terminal covers or insulating the battery terminals with appropriate materials. This additional layer of protection can prevent sparks or electrical accidents during maintenance.
Step 7: Wiring and Key Switch:
The wiring and key switch play a vital role in starting and controlling the generator. Here’s some insightful information:
Starter Motor Connection:
The wiring from the starter motor is essential for initiating the engine’s cranking process. Ensure that the wires leading from the starter motor are of the appropriate gauge to handle the current required for starting the generator.
Solenoid Switch Connection:
The solenoid switch acts as a relay between the battery and the starter motor. It’s responsible for engaging the starter when you turn the key. Properly connecting the solenoid switch is crucial for a smooth and reliable start.
Key Switch Selection:
The key switch serves as the control interface for starting and stopping the generator. Choose a high-quality key switch that is designed for continuous use and can handle the generator’s voltage and current requirements.
Insulation and Security:
All wiring connections must be properly insulated to prevent electrical shorts and ensure safety. Additionally, secure the wiring in place to prevent vibration-induced damage or accidental disconnections.
Testing and Troubleshooting:
After completing the wiring, thoroughly test the system to ensure the key switch effectively starts and stops the generator. Be prepared to troubleshoot any issues that may arise, such as loose connections or faulty components.
Step 8: Testing the Electric Start
Testing the Electric Start is a crucial phase in ensuring the proper functioning of your generator. The electric start system typically comprises a starter motor and a battery. Here are some deep insights into this step:
- Starter Motor Engagement: When you turn the key switch to the “Start” position, you’re activating the starter motor. This motor is designed to crank the engine, initiating the combustion process. It’s essential to have a functional starter motor, as it’s responsible for kickstarting the generator.
- Spark Plug Connection: Reconnecting the spark plug wire to the spark plug is vital. The spark plug creates the spark necessary for ignition in an internal combustion engine. If this connection is loose or absent, the engine won’t start.
- Troubleshooting: If the engine doesn’t start during the test, it’s important to troubleshoot. Check the battery’s charge, inspect the spark plug and wire for damage, and ensure all electrical connections are secure. Also, verify that the key switch is functioning correctly.
Step 9: Final Adjustments
Ensure the reliability and longevity of your generator’s electric start system. Here’s a deeper understanding of this step:
Smooth Engagement:
A smooth engagement of the starter motor is critical. Any jerky or rough engagement can lead to mechanical stress and wear on the system. Adjustments might involve fine-tuning the connections and lubricating moving parts.
Inspect for Loose Components:
Vibrations from the generator’s operation can cause components to loosen over time. It’s essential to inspect all components, including wires, bolts, and connections, to ensure they are tight and secure.
Preventive Maintenance:
This step goes beyond just fixing issues. It’s about preventing future problems. Regularly checking and adjusting the electric start system can extend its lifespan and reduce the chances of unexpected failures during critical situations.
Conclusion
By following these steps and using the right tools and materials, you can transform your pull-start generator into an electric start powerhouse. This conversion not only enhances convenience but also makes your generator more accessible to users of all physical strengths. Always prioritize safety during the installation process, and refer to your generator’s manual and the starter motor kit instructions for specific details. With your newly upgraded electric start generator, you can enjoy reliable power generation with ease.
FQAs
1Q. Why should I convert my pull-start generator to electric start?
Converting to electric start makes it easier to start your generator, especially in cold weather or when you have limited physical strength. It can also be more convenient for remote operation.
2Q. What do I need for the conversion?
You’ll need an electric starter motor, a battery, a key switch, wiring, and possibly a charging system for the battery. The specific components may vary depending on your generator model.
3Q. Can I perform this conversion on any generator?
Not all generators are designed for conversion. Ensure your generator is compatible and has provisions for an electric start kit. Consult your generator’s manual or manufacturer for compatibility information.
4Q. Is this a DIY project, or do I need professional help?
It’s possible to do it yourself if you have basic electrical and mechanical skills. However, if you’re not comfortable working with electricity or are unsure about the process, it’s safer to hire a professional.
5Q. How much will it cost to convert to electric start?
Costs can vary widely based on the generator model and the quality of components you choose. It’s essential to budget for the starter motor, battery, wiring, and any additional parts needed.
6Q. Are there safety precautions I should take during the conversion?
Yes, safety is crucial. Make sure to disconnect the spark plug and the generator from the power source before starting any work. Follow all safety guidelines in your generator’s manual and wear appropriate protective gear.
7Q. Will the electric start affect my generator’s performance?
When properly installed, an electric start conversion should not significantly impact your generator’s performance. However, it’s essential to choose high-quality components and follow installation instructions carefully.
8Q. Do I need to maintain the battery regularly?
Yes, the battery requires regular maintenance, including checking the charge level and ensuring the connections are clean and secure. Follow the battery manufacturer’s recommendations for maintenance.
9Q. Can I still use the pull start after the conversion?
In most cases, yes. A well-executed conversion allows you to use both the electric start and the pull start as backup.
10Q. Is it possible to convert a dual-fuel generator (gasoline/propane) to electric start?
Yes, it’s possible to convert dual-fuel generators to electric start. However, the conversion process may be more complex due to the additional components and fuel systems involved.